A couple of my favorite blogging friends recently asked me how I make my collages. You asked, and I'll deliver! Tonight I created a collage of pictures from our family bike ride to our favorite candy store (I know... bike ride to a candy store is kind of an oxymoron, but humor me here). Below the collage is a step-by-step tutorial using Photoshop Elements 7. You can click on the pictures to enlarge them if you need to. Are you ready?

Import all of your pictures into Photoshop that you plan to use. Select an image by double clicking it. Then at the top select Layer--> New-->Background Layer. Select the corner of your picture to reduce the size. It will reveal the blank background. Actually, the background will look gray and white checked, but it will be invisible when you publish.

Import all of your pictures into Photoshop that you plan to use. Select an image by double clicking it. Then at the top select Layer--> New-->Background Layer. Select the corner of your picture to reduce the size. It will reveal the blank background. Actually, the background will look gray and white checked, but it will be invisible when you publish.
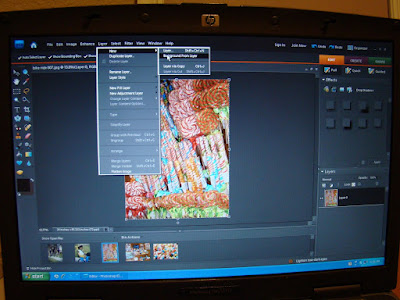
Click the green check mark if you want that image included in your collage. Then, drag and drop each picture onto the checked background that you want included. Don't forget to click the green check mark for each picture.
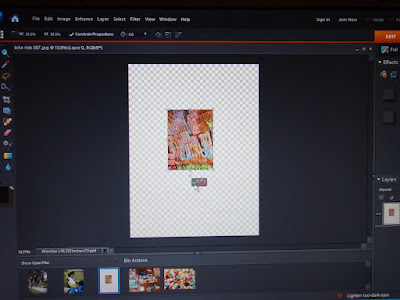
Now your collage looks like this. You can change the size of any picture simply by clicking on the image to select it and grab the corner to size it up or down. If you want to overlap or skew the pictures, put your cursor near the corner of the picture and a curved arrow will appear. You can turn the picture right and left to make it just right. If you want to add a drop shadow and make it look kind of dimensional, then look on the right side of the screen for the little white hand. That's my cursor. Select "drop shadow" and then choose which kind you would like. You must select one picture at a time, then click on the drop shadow that you'd like to use, then click "apply". Do this for each picture.
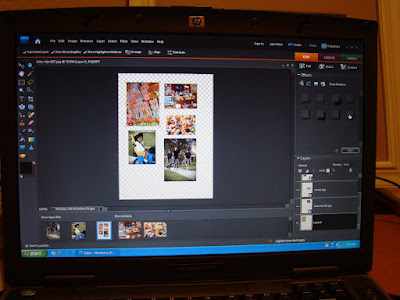
The next step is to select the "crop" tool on the left of the menu. Crop the collage to your liking, remembering not to crop it too short and cut off any drop shadows.
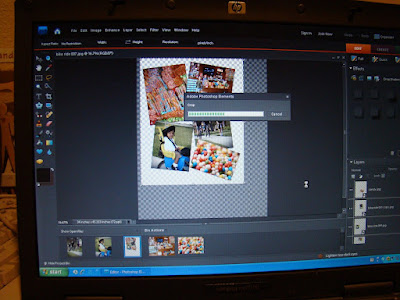
Now we have to save the collage. At the top, select File-->Save to Web.
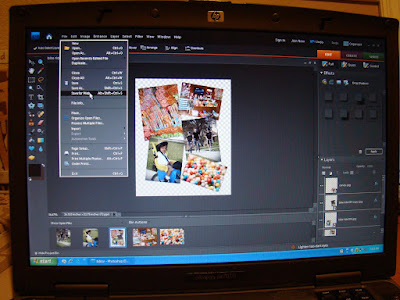
On the far right side type in how many pixels wide you'd like it. I chose 550 because the center of my blog is just a bit bigger than that. Also (top right) select PNG and click the "transparency" box because we want the checkered background to disappear when we publish.

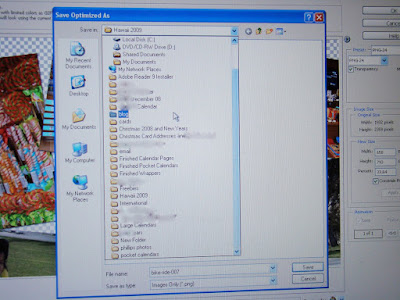
When you click "OK" select the location that you would like to save your collage. Remember where you save it. I'm saving mine to a folder I titled "Blog".
Now I minimise Photoshop and open up a new window and go to Photobucket.com. You have to upload your collage to a site like this. They will automatically generate a HTML code for your blog. After you upload it (It really only takes like 20 seconds or less), find the place that says "HTML code for Blogs" (Look at the bottom right hand corner. It's highlighted in blue). Right click your mouse and copy that code.





 Big Kahuna and I have known each other since we were kids and have been married for almost 15 years. We are passionate about our family, travel and serving God. We love helping people and bringing them hope. We laugh ourselves to tears watching classic episodes of Saturday Night Live and The Office. Summer is our favorite season, and we live for warm evenings playing with the kids on the beach.
 Big Surf is 14 years old. He's a voracious reader, focused, and spends hours building things. He is our resident techie and is also learning to play the violin. He loves to spend his free time playing baseball, flag football, or out on the trails by the house building his clubhouse.
 Goofy Foot is ten years old. He devours his free reading books like there is no tomorrow. He is also the family comedian. If you see him, ask him to tell you a joke! He is tender-hearted, social and compliant. When he is not outside riding his bike, you'll find him drawing or writing a funny book.
 Beach Bunny is three years old. She is our sunshine! She joined our family through the unbelievable gift of adoption. Beach Bunny loves to snuggle with us and carefully takes care of her baby dolls. She is super silly and must say hi to everyone! One word that describes her is "joy".

10 comments:
OH im too poor for photoshop ;o( sniff sniff!!! LOL
VERy cool pics!
hugs,leslie
Wow, I love it, I am going to have to try it one of these days!
Photoshop looks so cool, I must try it!! Thanks for all your sweet comments on my blog, and your pics on your blog are wonderful!!
Hi friends,
Try downloading Paint.net (FREE!). It does practically the same thing as Photoshop! :)
Joanna
You rock!! Thanks for the tutorial! I will definitely need to try this out.
I'll have to look into this more later.
I did it! Woohoo!! But, even though I had transparency marked, the faint outline still shows up on my blog. Not sure what to do about that. But, thanks! It got me inspired!
Thanks for playing along with Oldies but Goodies! This was a very imformative post!
I use Elements and Premeire all the time. They are just two of the best editing suites out there in my opinion.
Make sure you put a link in your post to The Fort. Its greatly appreciated.
Once the Blog Hop linky is up you wont need to do this as my link will be in the linky along with everyone elses!
Love and Prayers,
Tim
Love and Prayers,
Tim
Oh, thanks for that tutorial... I love to get all the info and help I can get :o) I also stepped into Photoshop when I started the blogging and etsy, so if you could seen me that first week or more, trying to even get a picture to show up, much less get them to cooperate (image size, background size, enhance, minimize, maximize? what? I just want to get the photo to show!)
...anyways, I am slowly getting it and wow I love how your collages look! I thought I had to absolutely fill every part of that background with something!
I'll be trying this out and think it'll be what I do for collages from now on...if I get it to work :o)
Blessings & Aloha!
Bravo, your phrase is useful
Post a Comment